
Last Updated on November 4, 2023 by Sharon Advik
As an experienced photographer with many years of experience, I know how hard it can be for beginners to understand the technical side of photography.
But getting good at these basics is necessary to take beautiful pictures.
I will explain all the complicated parts of the aperture in this detailed guide, giving you helpful information and valuable tips.
This guide will help you understand aperture settings better, whether you’re a beginner or an experienced photographer who wants to improve their skills.
Understanding Aperture in Photography:
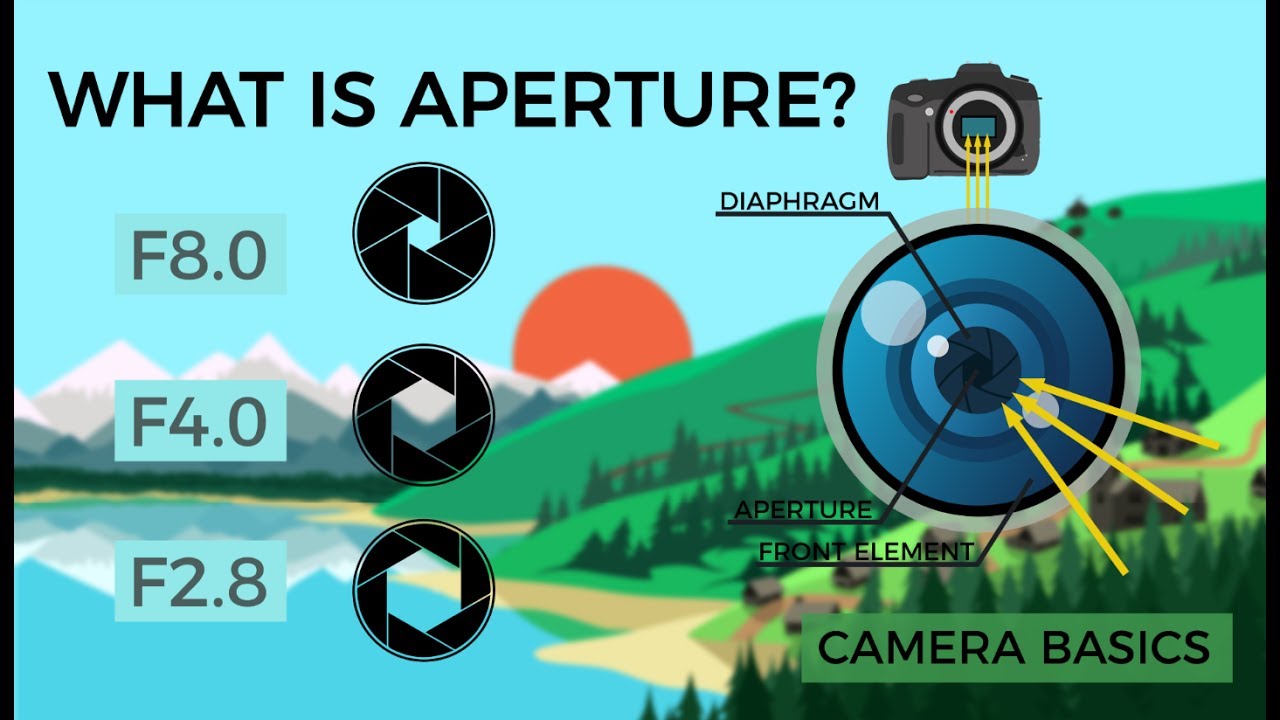
What is the aperture?
Simply put, the aperture is the hole in the lens of your camera that lets light reach the film or picture sensor.
The amount of light that gets into the camera is controlled by something that works like the pupil in our eyes.
f-stops, which are numbers like f/1.4, f/2.8, f/5.6, and so on, are used to measure aperture.
In real life, the aperture sets the camera’s exposure, which changes the amount of light that hits the sensor and the depth of field (DoF) in your photos.
Along with shutter speed and ISO, it’s one of the three main factors determining how exposed a picture is.
A Video That Explains Aperture:
To give you a better idea of what aperture means, let me tell you about a recent shooting trip I took with my trusty Canon R5 camera to take pictures of the scenery.
At dawn, I set up my camera on a beautiful hillside with a view of a calm lake. I wanted to take a picture of the soft, ethereal light bathing the countryside as the sun rose.
I had to change my lens settings to do this.
At first, I set the lens to f/2.8, which let a lot of light into the camera.
This setting for a wide aperture made the depth of field very shallow, which made the background look beautiful and blurry while the main subject, a cute old tree, stuck out clearly in focus.
Another thing I did was make a video to help my fellow shooters understand what aperture means.
I changed the aperture in real-time in the movie to show how it changed the scene’s exposure and depth of field.
People who wanted to learn more about the technical side of photography found this visual example very helpful.
What Aperture Does to Exposure:
The most important thing you can do to control the brightness of your photos is to change the aperture.
The aperture opening size is shown by the f-stop numbers, which can be f/1.4 or f/16. Apertures with smaller f-stop numbers are wider, and apertures with bigger f-stop numbers are narrower.
A bigger aperture, like f/1.4, lets more light into the camera, which makes the picture brighter.
This is especially helpful when there isn’t a lot of light, like when you want to take a picture of the stars at night or the warm atmosphere at a dinner with candles.
On the other hand, a smaller aperture (like f/16) lets less light into the camera, making the picture darker.
This setting is excellent for taking pictures outside on a sunny day because it keeps the details in your photos from getting too dark.
The most important thing to remember is that you can change the exposure of your photos by changing the aperture along with other settings like ISO and camera speed.
This gives you the freedom to work with different lighting situations and still get the results you want.
What Aperture Does to Depth of Field:
Shooters need to understand how the aperture changes the depth of field.
The range of lengths in your picture that look sharp and in focus is called the depth of field.
The lens settings can be changed to change it.
For example, while I was hiking, I came across a peaceful forest picture with exciting details in both the near and far background.
I had to adjust the depth of field to get this picture carefully.
With a wider lens, like f/2.8, I was able to make the depth of field very shallow.
This made the things in the center, like a bed of bright wildflowers, stand out clearly, while the tall trees and faraway hills in the background looked dreamy and blurry.
The result was a picture that was striking to look at and made the subject stand out from its surroundings.
I often choose a narrower aperture, like f/11 or f/16, when taking wide landscapes.
This makes the depth of field bigger, ensuring that everything is clear, from the rocks in the center to the mountains far away.
What Does F-Number and F-Stop Mean?
As you may have noticed, aperture values are often shown by numbers like f/2.8, f/4, f/8, etc.
These numbers are the same as f-stops, a common way to measure aperture settings.
The aperture’s width or length is shown by its f-number, which can be f/1.8 or f/11.
A wide aperture is shown by an f-number less than 1.4. A narrow aperture is shown by an f-number greater than 16.
To make good changes to your camera settings, you need to know how f-stops and aperture size work together.
Aperture Size: Big vs. Small:
You can choose between a large and a small aperture based on the weather and the goals of your photography.
Here is a list of times to use each one:
Large apertures, like f/1.4, are great for taking pictures indoors or at night when there isn’t much light.
– Makes the depth of field very shallow, which is great for portrait photos because it lets you focus on the subject and blur the background.
— Makes lovely bokeh, those dreamy, out-of-focus background details that give your pictures a magical touch.
The small aperture (f/11 or less):
This setting makes the depth of field bigger so that everything from the center to the background is in focus. It works best for scenes with a lot of light, like landscapes in bright sunlight.
– Good for building photography, macro photography, and other times, you must catch small details.
How to Choose the Best Aperture:
When choosing the right angle, you must consider the subject, the background, and the lighting.
Let’s look at some situations where you can figure out the best aperture settings:
Portrait Photography: You usually want to keep the background out of photos so that the subject stands out.
For this, pick a wide aperture (f/2.8 or less) so that the background is blurry, but the subject is still very clear.
Landscape Photography: When you take a landscape picture, you want the whole scene to be in focus. Choose a narrow aperture (f/8 or higher) to get the most depth of field, and make sure that features in both the foreground and the background are clear.
When taking pictures of small things up close (macro photography), you need a small aperture (f/16 or higher) to get the depth of field to keep the subject sharp.
Photography in Low Light: A wide aperture (like f/1.4 or f/2.8) lets more light into the camera, which makes it easier to take well-exposed pictures without having to use a high ISO setting.
Artistic Photography: You can try different aperture settings based on your artistic ideas. A wide aperture can make interesting bokeh patterns and draw attention to your subject, while a narrow aperture can give your picture more depth.
Make changes to your camera’s aperture. Aperture adjustments on your camera are pretty easy to make.
Related article:
What is a DSLR (Digital SLR) Camera?

I am a Professional and Certified Digital Photographer born in the USA. I have been in this field of photography for 22 years, and in these years, I have used many photography lenses and Cameras, which I want to share here on this website about my experience. The idea for Bestoflens.com is to provide honest information about different Lenses and Camera products in the format of a “Best lenses for AYZ” list. I want this website to be the last destination for people to pick the best Cameras and lenses to fit their needs. You can find our unbiased reviews here on Bestoflens.